

I am super excited to welcome my first guest blogger to Drea Macmillan Social Marketing! These days photography is becoming a valuable skill for anyone involved in social media so Annalisa Jackson a.k.a The Beanie Bard is going to take us through the basics of DSLR over an 8 part blog series! Getting snapping guys!
Part One: Introducing you to your camera, don’t be shy now
by Annalisa Jackson
Disclaimer: I am not a professional photographer though I am studying to be one. This is an introduction to cameras and photography for somebody starting right out and may be of less interest to experienced photographers, who may actually turn puce and run screaming for the hills at my words.
 So you want to take up photography? No? You want to take a few photos but dont know which camera to buy? No?…In that case the toilet is on the third door on the right…but for those of you interested in the first two options welcome to my 8 part blog series introducing you to the amazing world of photography. This part will take you right back to basics. It will explain the history of photography briefly, before discussing the pros and cons of different cameras and lastly a view of the component parts of the camera.
Photography, for those who are unaware of the origins of the word, was a term coined in 1839 and comes from Greek. Photos is the word for light and Graphos for the word for drawing so literally it means drawing with light, which I think is a rather beautiful term for the art form that photography is. To take a photograph you need a source of light and a light sensitive sensor or material like photographic film to record it. The medium by which the two meet is the humble camera, the focus of today’s blog.
The ‘camera obscura’ is an invention which dates back to 4th/5thcentury China and was a pin hole camera which directed light onto paper for drawing. Natural camera obscura can be found in dark caves on edge of sunlit valleys. A hole in the cave wall will emit an upside down, laterally reversed image onto the cave wall, and by holding a piece of paper over the image you could render an accurate drawing of the scene.The first recorded photoetching, after various attempts, was finally made in 1822 by French inventor Nicephore Niepce, before he suceeded in creating the world’s earliest surviving photograph in 1827, entitled View from the window at LeGras. In order to record the image the shutter had to be left open for several days. Very different to the thousandths of seconds cameras are capable of today. The first digital photograph, however, was made in 1957 by Russell Kirsch: a scanned 176×176 pixel image of his 3 month old son, an entire 2 decades before the first digital camera.
These days, however, there are 4 main options available to you for a camera. There are more than 4 if I am honest, but if you are looking at film cameras, CSC, mirrorless or full frame cameras you are probably not a novice or even capable of writing this blog for yourself. The first option is the one most people have, the smart phone.
1. Smart phone cameras:
Most phones now have cameras, though the quality will vary. Unless these are towards the top end they will mostly be used for every day photography such as selfies,arty photos of your fish and chips and and Aunty Margery dancing the macarena after 3 glasses of gin at family get-togethers. Those which are at the top end now sometimes have options for advanced photography techniques and can be used for a lot of photos as part of your camera range. Though they will still also take good photos of Aunty Margery if that is your particular need.
2. Secondly and third are your ‘point and shoot’ and your ‘bridge’ cameras. The point and shoot cameras are easily recognisable as the small rectangular cameras with built in LCD screens and flashes. Like phone cameras these have a wide range of quality and ability. At the lower end they are probably comparable with your average phone camera but towards the higher end also are a valuable addition to your camera range, easy to slip into a handbag for opportunistic shots and travelling (selfies or fish and chips in other countries). They have smaller sensors which can affect photo quality, but the higher quality ones often have long zooms and options for manual photography, though the photos may not stand up to cropping quite so well due to quality and cope with night photography less well. On the plus side you can buy rugged versions for travelling if you are planning to go Bear Grylls.
3. Bridge cameras are exactly what the name suggests: a bridge between these small cameras and the much higher spec DSLR. They have a larger body and non removeable lenses, though these are capable of much higher magnification. They tend to have a slower focusing rate and still tend to produce lower quality photos than a DSLR due to having a smaller sensor – similar in size to that on a point and shoot. However, being a digital zoom system they can often have a much bigger zoom range than even a telephoto lens on a DSLR whilst taking up much less weight and being much smaller. As such are very worth considering as they often offer manual photography options now and some come with a hotshoe for attaching an external flash. More on that shortly.
4. Lastly is your ‘DSLR‘. DSLR’s are what most people imagine in their mind when they think of a ‘traditional’ camera, with a larger camera body and interchangeable lenses. ‘SLR’ stands for ‘single lens reflex’, meaning you have a single interchangeable lens and a mirror that moves in a ‘reflex’ action when the shutter is open in order for light to reach the sensor or the film. ‘D’ of course stands for digital, meaning it has a digital sensor to record the image. Traditional versions with film were simply an SLR. These are much less portable, heavier and have a lot more fiddly bits to carry around like lenses and, if you want to get into photography more deeply, you can get into the realm of filters, remote controls, flash guns, tripods and spare batteries, meaning a much bigger bag to protect and carry it all. However, they have faster focusing rates, bigger image sensors for higher quality images and often a wider aperture range for a bigger range of options between photos where your focus range is wider such as deep focus for landscape and shallower focus required for things like macro photography.
Parts of the camera
Here are some photos of my camera:

This is the back of my Canon DSLR. The primary parts you see here are the LCD screen on the left, which will show you digital images of what your camera is going to show when the shutter button is depressed, and the view finder above the LCD screen which you look through if you prefer to frame your image by eye. You switch between the two with the small button with a picture of a camera on it. To the right of the LCD screen are the settings button set in the form of a circle. Some brands may have a wheel instead. This will allow you to make different adjustments to your photo settings such as white balance, focus types and points or to timer or burst photo options. Under the settings buttons are the play back and deletion buttons for in camera viewing/deletion of images, and to the top left is the menu button to make changes to the settings of your camera or add filters. We can come to the other buttons in later blogs. My camera has a battery grip which is the part under the screw wheel and is an optional extra which allows me to insert two batteries for longer shooting stints before running out of power as I can be out all day (and often forget to charge my battery as I have the memory of a goldfish).
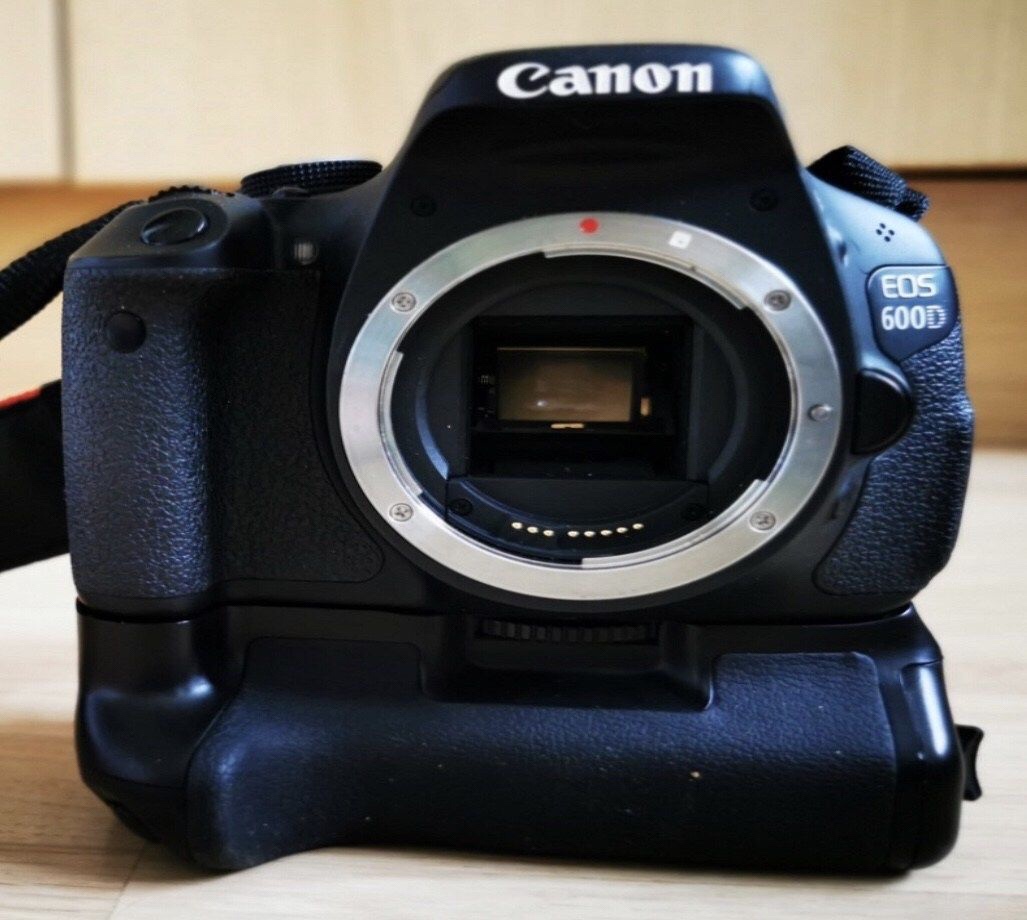
This is an open photo of the front of my DSLR. Usually, of course, a lens would be attached to this (unless my memory is REALLY bad…). The silver ring contains the electronic attachment points for the lens and inside you can see the mirror. When the shutter button is depressed this will lift to allow light to the sensor behind it.
When the shutter button is not depressed the image from the lens is sent to the mirror but is upside down and laterally reversed. The mirror will direct it upwards to a pentaprism which corrects it so it can be viewed accurately through the viewfinder.
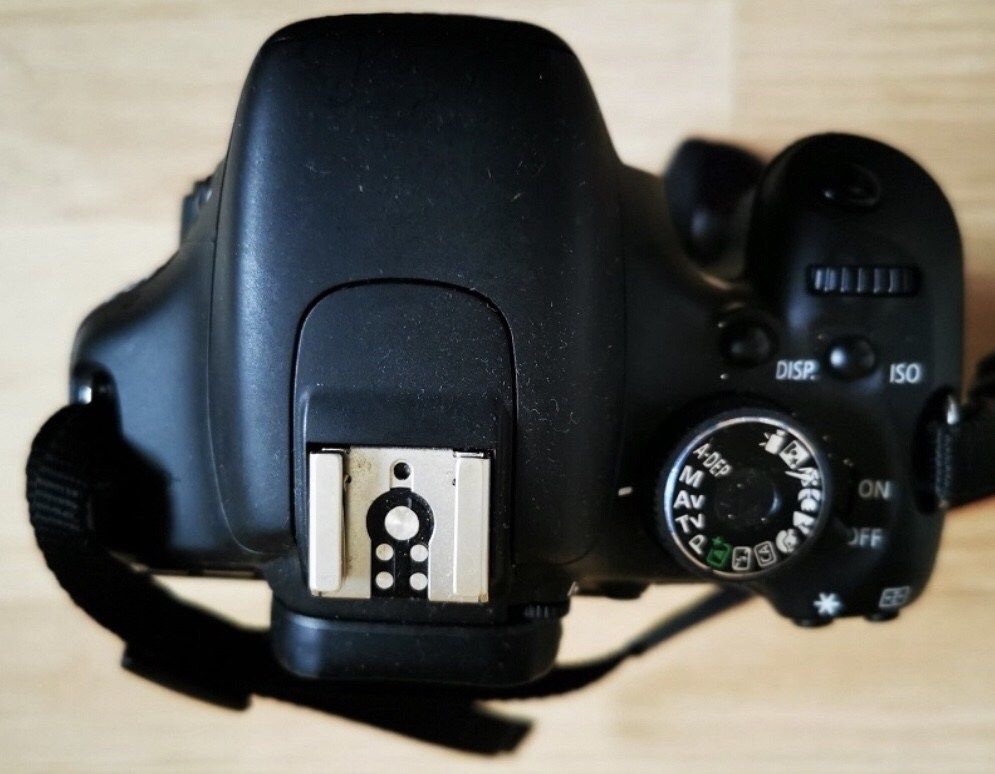
Lastly this is a photo of the top of my camera. The silver slide mechanism to the bottom left is known as a hot shoe. It allows for an external flash to be connected. The internal flash is below it in the front protrusion. To the right is at the very front is the shutter button you depress to take photos. The other buttons and the wheel are to adjust the ISO, which we will come to in a later blog. Below this is what I call the ‘turny button’. It is a selection wheel but I prefer turny button and turny button it will become in later blogs. Just as a PSA. On this wheel you will find your different shooting modes. Video is, of course, video. Then you will probably find on most cameras a flower for macro mode (photos that are close up images or of very small subjects such as insects), a man running for high speed photos such as sports, a mountain for landscape photos and a lady in a hat for portrait mode. You will also find an option to turn your flash off, shoot in auto mode where your camera selects what it supposes to be the best exposure settings for you (the option most people start with) and the ‘MASP’ options. We will come to MASP in later blogs as with everything else I have promised. The on/off button is also located at the top and probably the most useful button you will need in your photography! Your camera user guide will be able to assist you with any different options if you have a different brand of camera but these are the generic settings on most. It is worth spending some time getting to know your camera if you plan to spend plenty of time together.
Hopefully this blog has been useful in giving you a very basic start point to your photography and you will want to follow the rest of the series where I will teach you how to correctly expose a photo, compose it and utilise your lens and shutter to manually take photographs that you will be proud off. You can find more of my work and my own photos at www.facebook.com/beaniebard or on Instagram at the_beanie_bard. Good luck!
The Beanie Bard
